If you are interested in solar energy to save on your electric bill but don’t know where to start, welcome. We will explain in a few simple steps how to find out which installation you need for your home.
Attention: The current regulations allow you to compensate for the surpluses of your solar installation that you don’t self-consume and that you pour into the electric grid directly in your monthly bill. From Tienda-solar we recommend this option as the most suitable for the majority of consumers. In this entry we will focus on this case, if it is not yours and you want to tell us your case, please contact us.
What information do I need beforehand?
At a domestic level the first step is to know:
- What consumption We will look for the bills of the last 12 months (a year cycle, starting in the month that begins). From them we extract:
- The consumption value of each month in kWh.
- The tariff we have contracted (for example 2.0A or 2.0DHA are the most common).
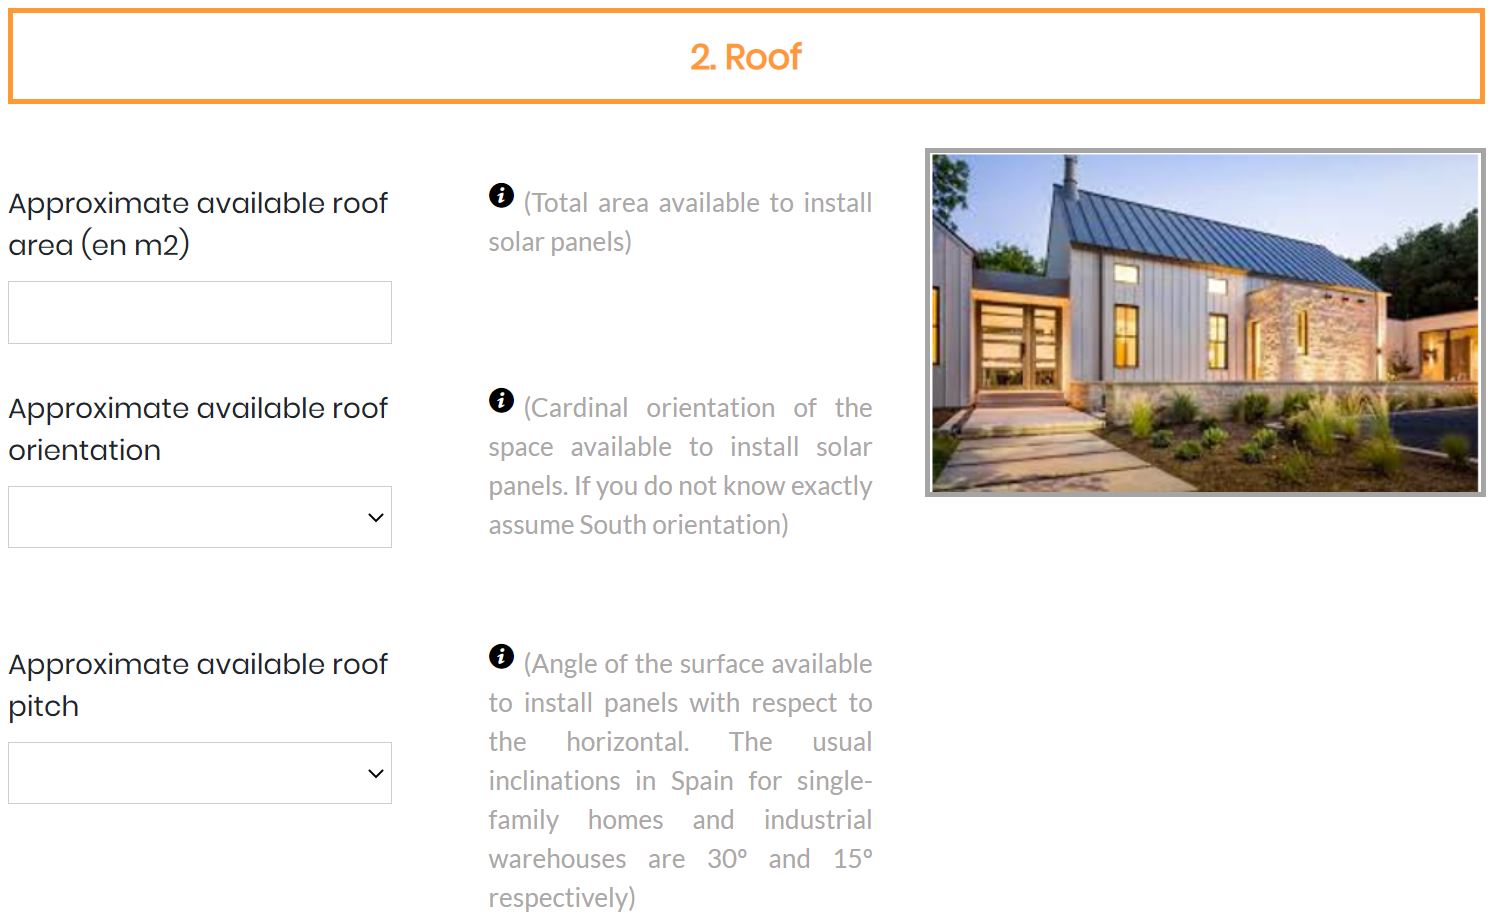
- What space we have for the placement of solar panels and how it is. We will have to know:
- What total area we have. The easiest way is to use the many free satellite tools we have on the internet. If we use the most known one (https://earth.google.com/web) and we look for our roof, terrace, or land where we want to place the photovoltaic panels, we can easily measure its surface with the “ruler” icon that appears on the left side.
- Roof orientation, approximate, if it is southeast, or east or southwest, for example. Keep in mind that solar panels produce their maximum if they are oriented to the south, so you have to look for your available surface to be as south oriented as possible. If you don’t know the orientation, in Google Earth it’s also easy to see it (in the lower right menu you can put the 2D view and click on the red of the wind rose to show north above, that’s how it’s best seen; east to the right and west to the left). Although the installation can be done with any orientation, the ideal ones are South, Southeast, and Southwest.
- Inclination. Keep in mind that, in general, the easiest way to install is to place the photovoltaic panels coplanar with the roof, so the inclination you should find out is that of your roof. Most are around 15º to provide rainwater fall, but it is possible that your case is different.
Having taken the above data, we can now use it to know which installation we need.
How do I know how many solar panels I need for my house?
It is very simple, collect the above information, we just need to access the Tienda-solar calculator.
- We start by indicating the location of the installation.
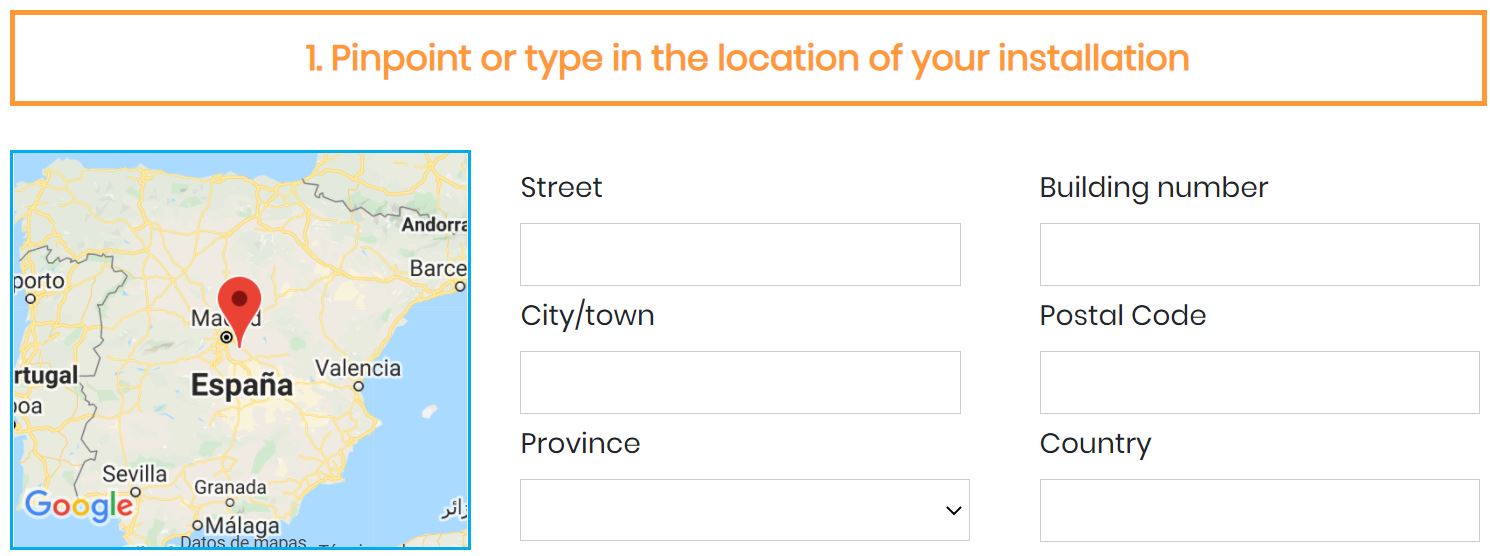
Once you enter all the data, the map pointer will move and show your location. Don’t worry if you don’t use the exact address, the location is only used by the system to calculate the exact amount of Sun you have in your site. So try to make it as close to the real thing as possible, so that it is realistic. 100 meters up or down will not impact the result.
- We indicate the characteristics of the space we have available.
The first thing is to indicate the surface in square meters that you have available. Let’s imagine that our roof is 4 meters long by 3 meters wide, so we will indicate 12 m2 (4×3=12).
If your roof is complicated and you have loose areas, count the total area, and do the calculation until the end. After that, you can send us the results and photographs or information about your roof and we will validate if your selected kit would fit you.
The second thing is to indicate the orientation of the roof. Remember that a maximum of solar energy (in the northern hemisphere) is that the solar panels should face as far south as possible. In this case, we ask you to indicate the orientation closest to the position of the roof; southeast, southwest, east, south, north… the one that is closest to your reality.
The third thing is to indicate what the inclination of this roof is. Usually, it will be between 15º and 30º. If you have any doubts, you can always use our calculator to simulate both options and see if the recommended result is the same. Remember, our calculator is free, you can use it as many times as you want.
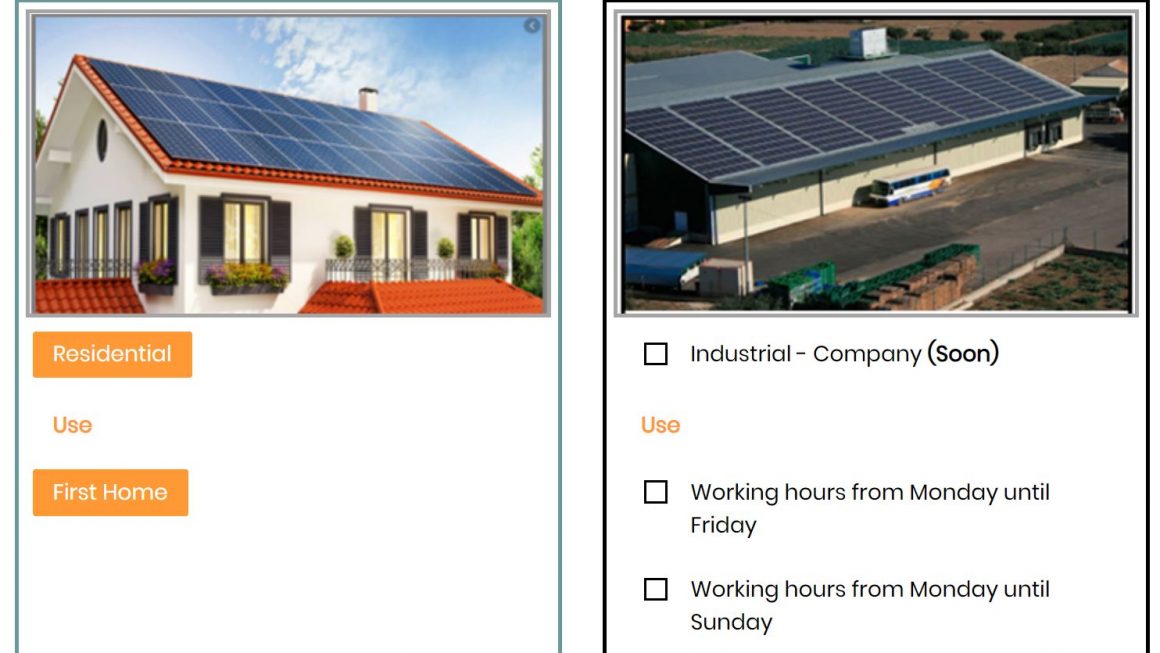
- We indicate the type of property.
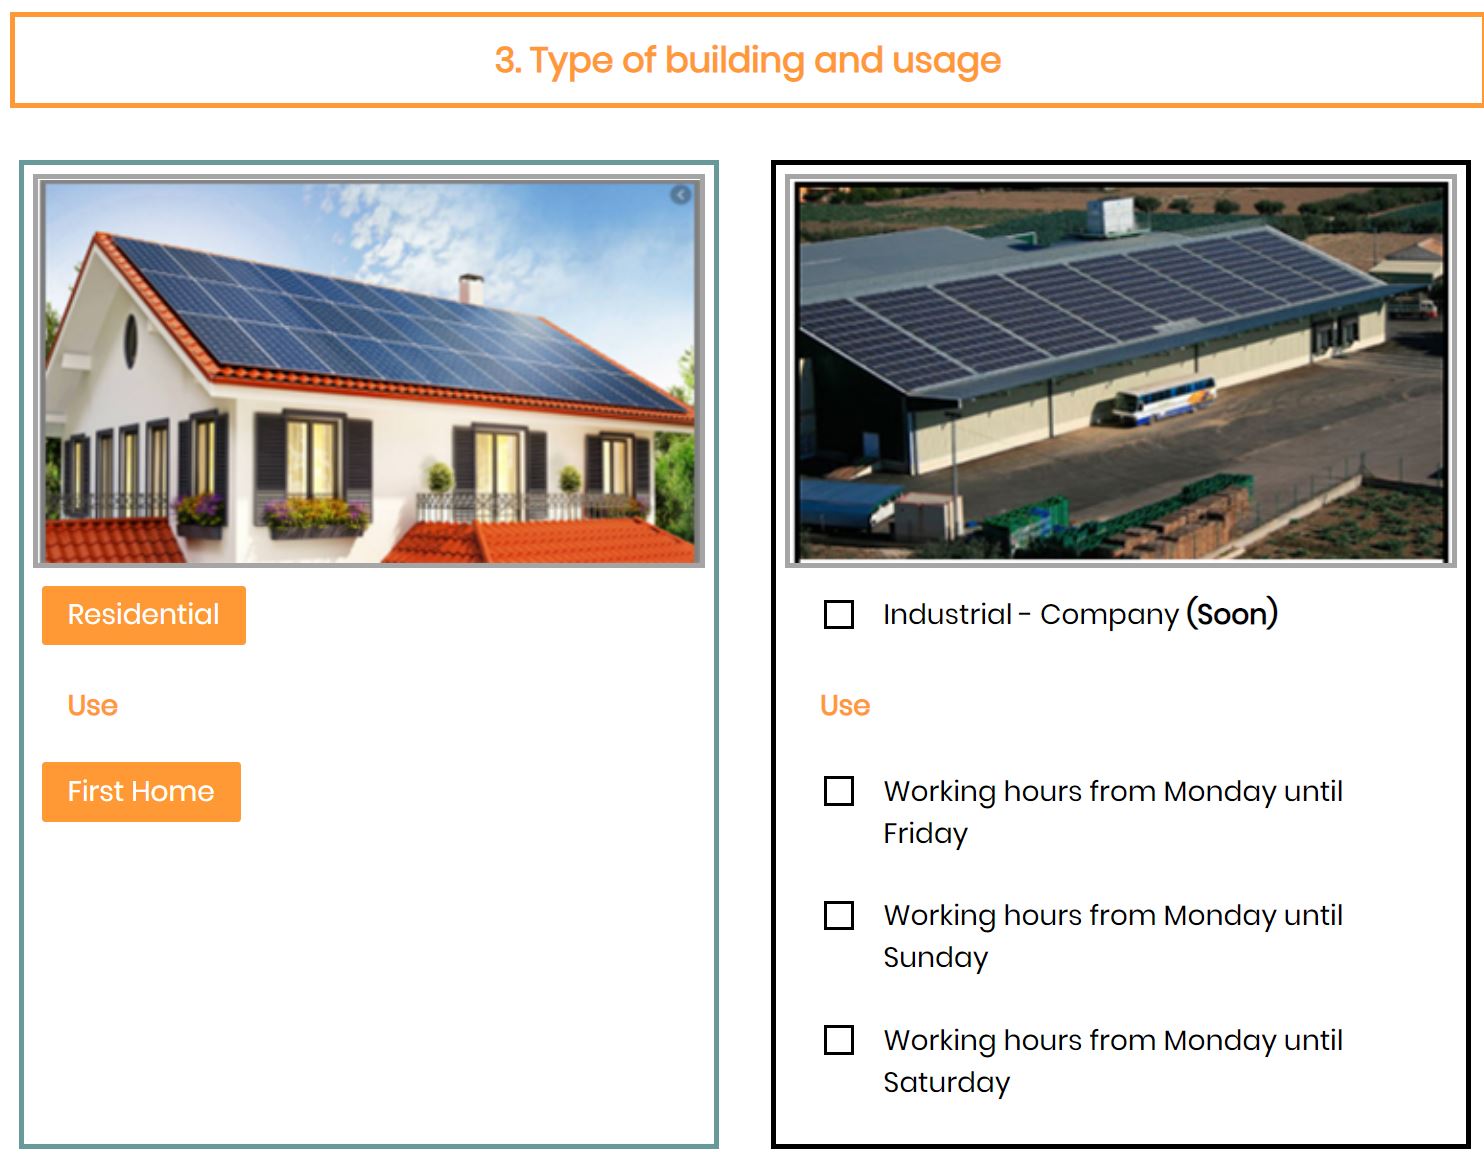
It indicates that it is Residential, and also that it is a First home.
Currently, you can only simulate a residential home, but if you have an industrial building, you will be able to simulate it soon. In the meantime, if you provide us with the same data as requested in the other sections, we can simulate it for you. Do not hesitate to contact us.
- We indicate the type of contract and the consumption of our house.
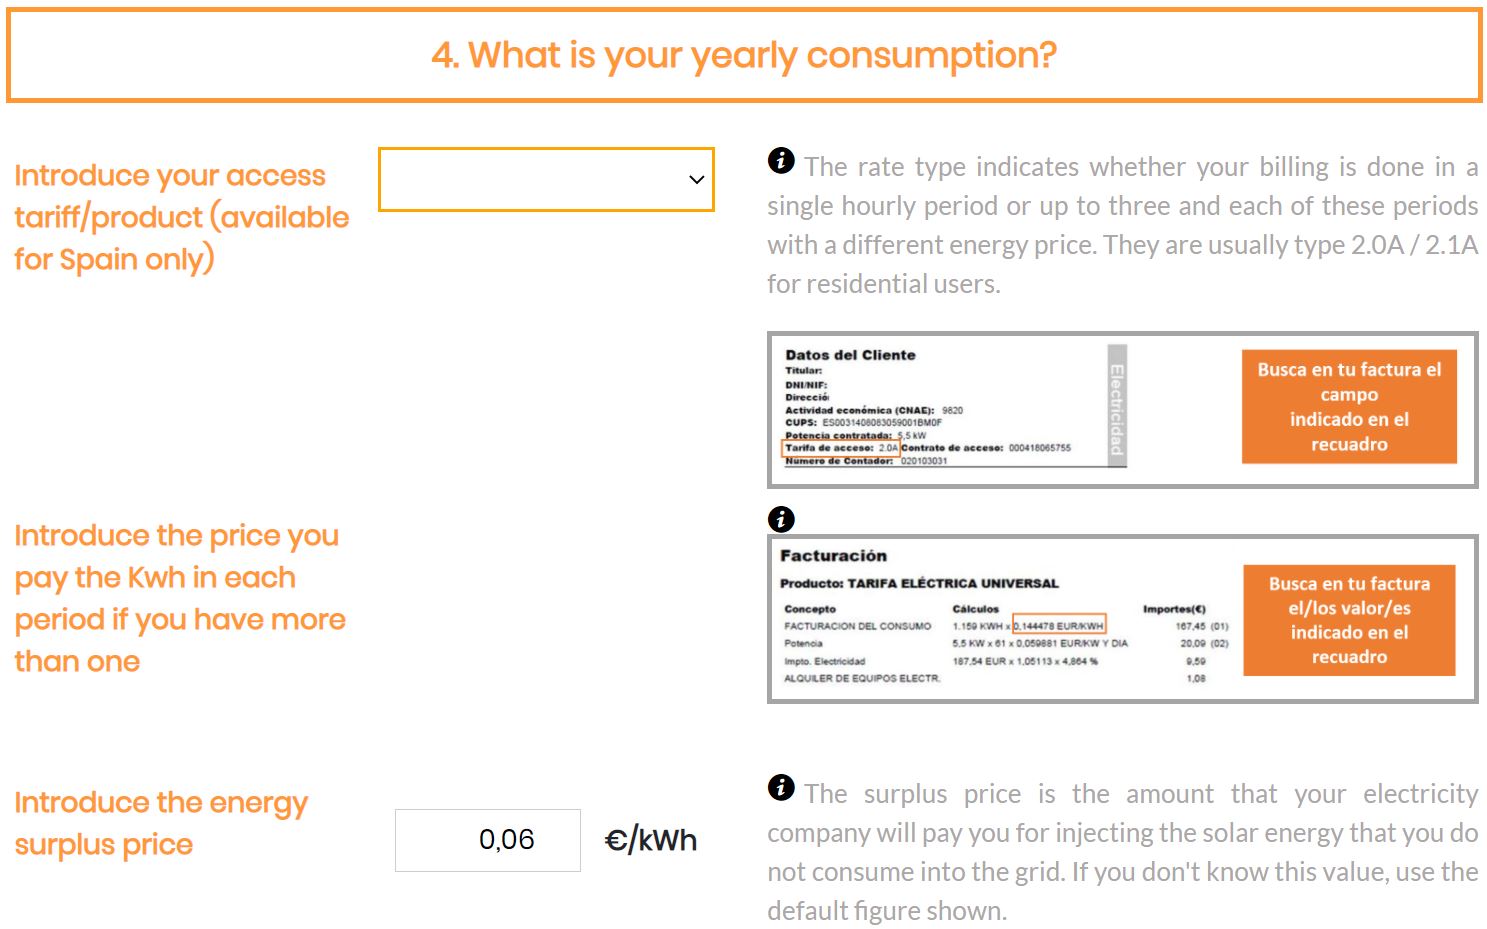
First, we indicate the type of rate. Select the type of contract from the drop-down menu:
Then, enter the price per kWh of your tariff. Use as “comma” the Spanish character of coma; for example 0,11.
Then we indicate (if we know it) the price to which our utility compensates the spillage of surplus energy to be discounted from our bill. If we do not know, we can indicate 0.05 or 0.06, which are reasonable values. If your supplier offers you a lower price, you can always switch to another supplier that will compensate you better.
Later we indicate the consumption at a monthly level:
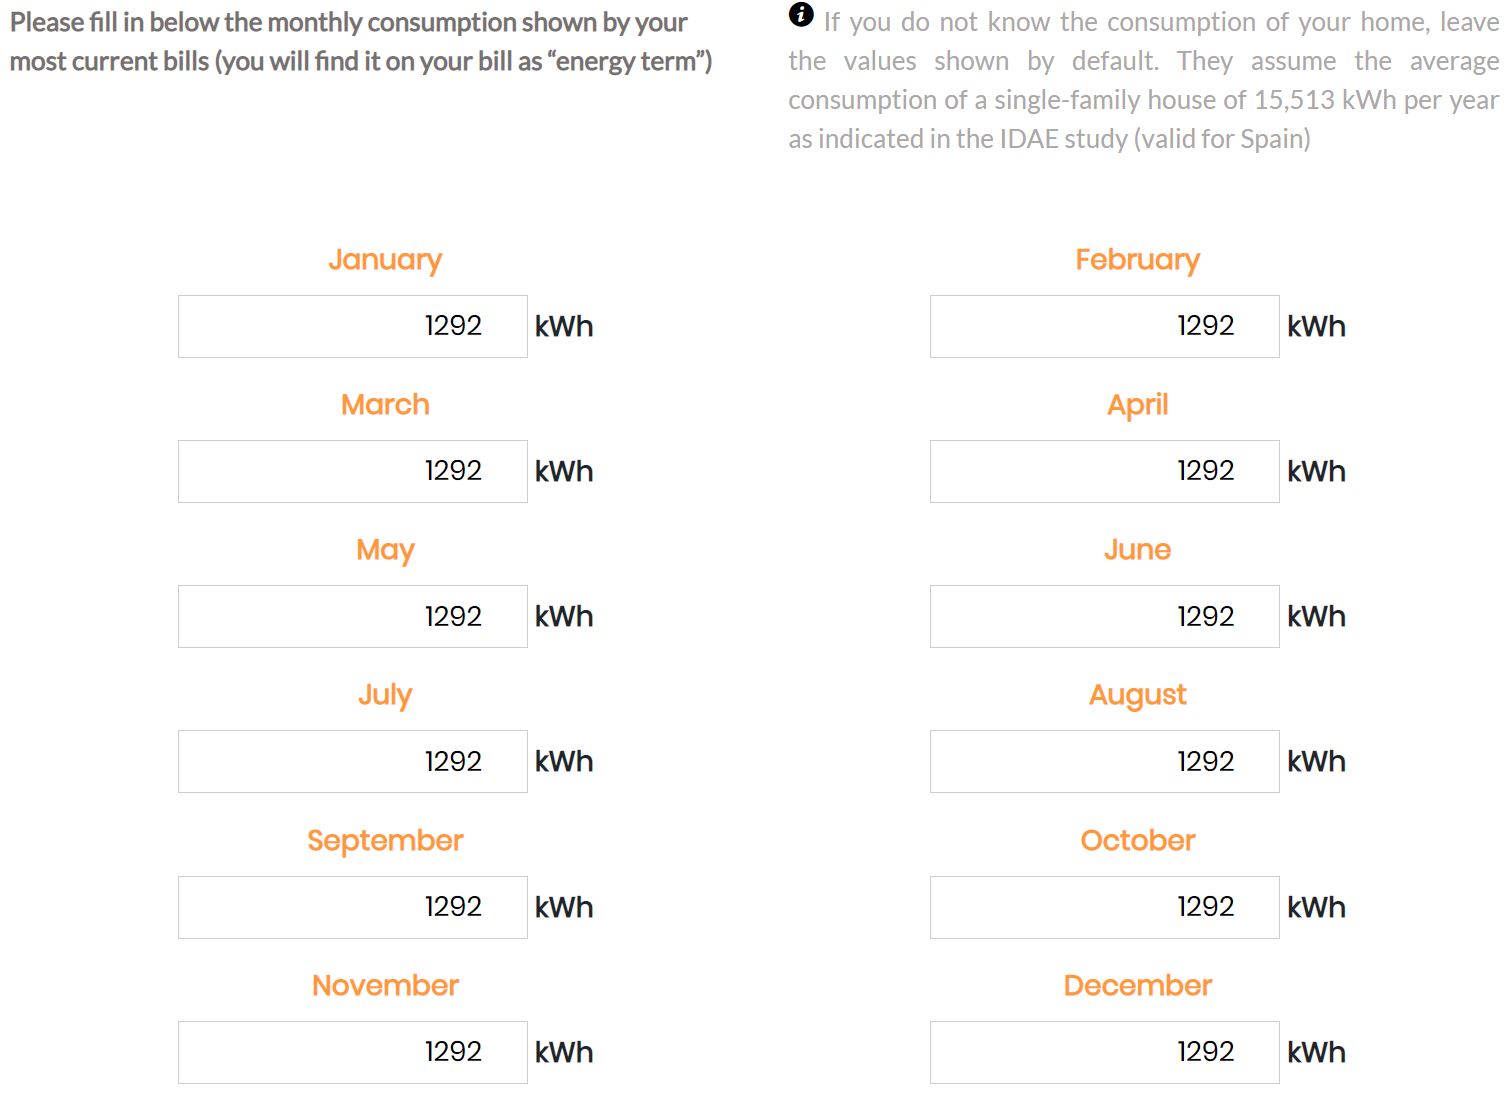
By default, average values are shown for a single-family home. But it is VERY IMPORTANT that you are as realistic as possible. Keep in mind that each house has a consumption pattern throughout the year that may be different, and the production of electricity with photovoltaics also varies throughout the year, so to get real results is very important to indicate these values very well.
You have already completed all the sections. All that remains is to see the results:
![]()
Now, let’s interpret the results.
The calculator shows two possible results, depending on your choice you can see the kit that will provide the best return on your investment or the one that will save more on your bill. They don’t have to be different, because sometimes if you have a limited amount of roof space available, the most profitable one will also be the one that provides you with more savings than there is room for.
You can choose which result is shown, by clicking on your choice:

From here on, the results are shown in the same way, simply vary the solar kit shown that meets each of the design criteria.
Energy results from the recommended solar kit:
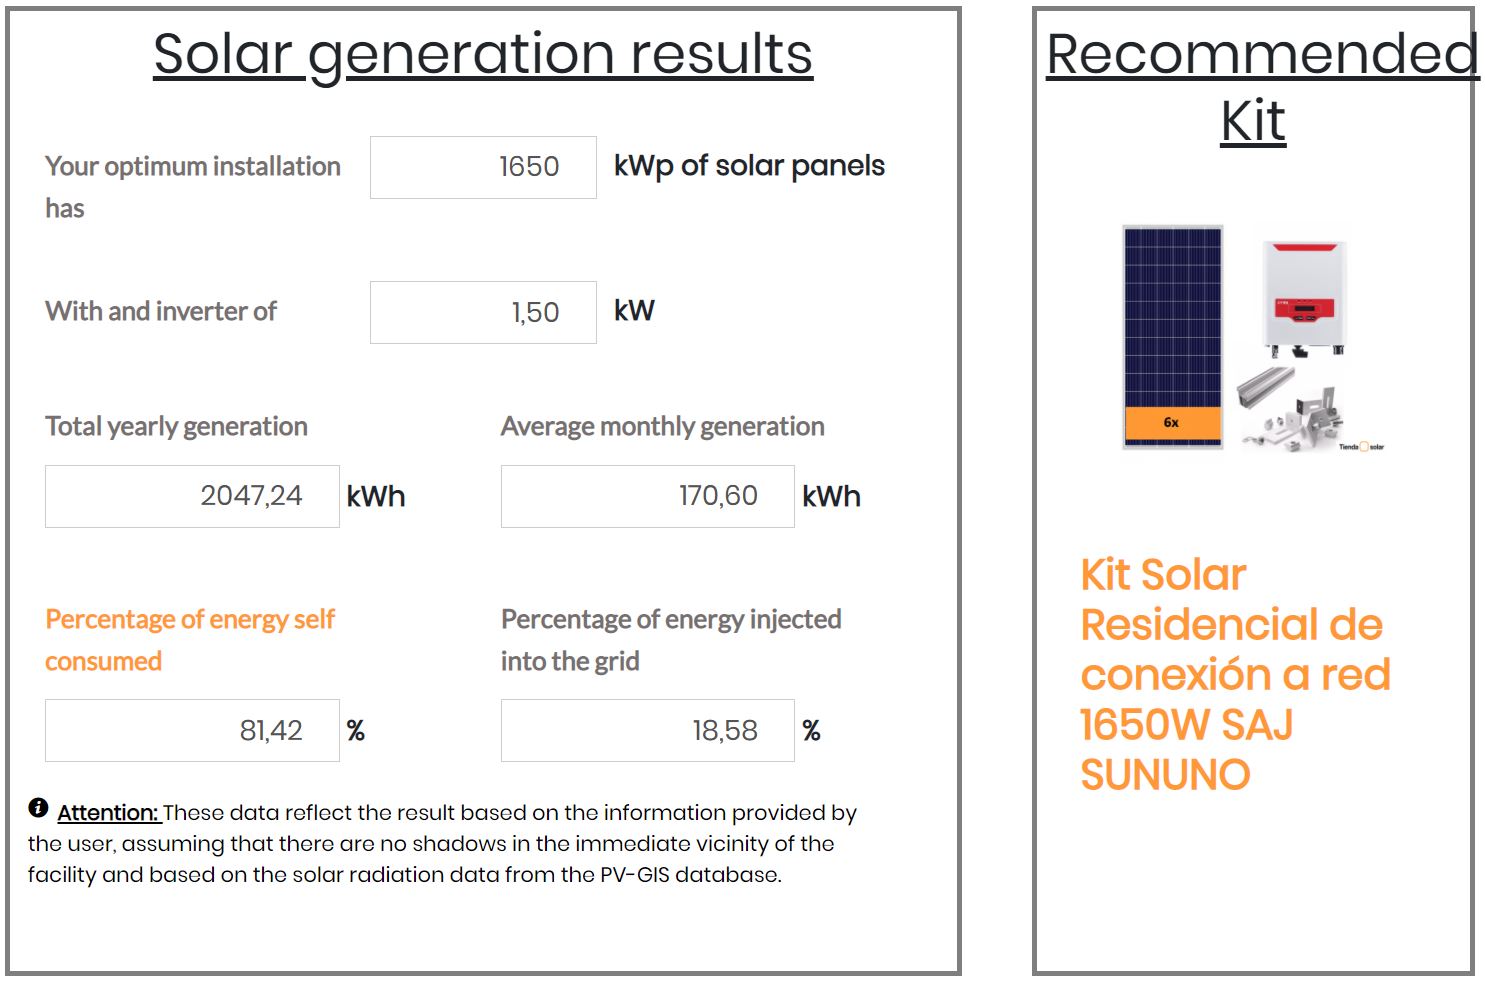
If we click on the solar kit, it takes us to its description in the store, which allows us to see all the information about it.
Economic results of the recommended solar kit:
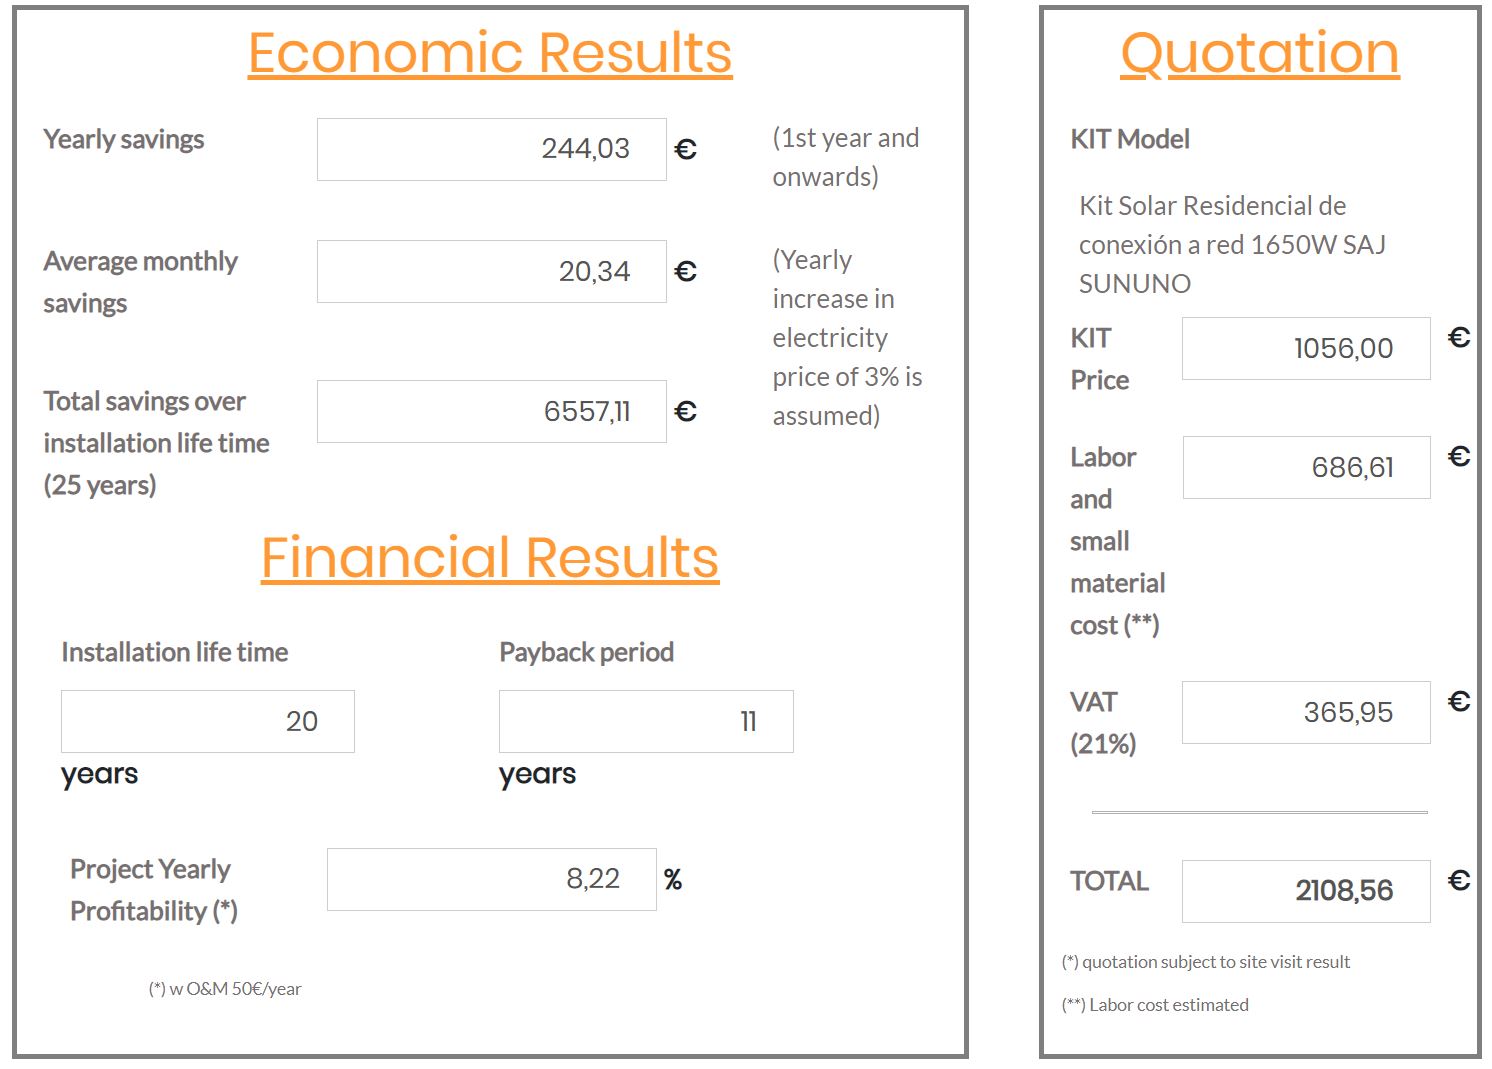
The budget shows an approximation of the installation cost based on our experience, but it must be validated by a professional installer requesting a visit for it. The installation costs can vary significantly depending on the ease of access to the roof, the distance between elements, or the space available for these.
And so, simply, you have taken the first steps to become a self-producer and eliminate a few tons per year of CO2 from our atmosphere while making an economically profitable investment.
Speaking of profitability… DO NOT FORGET TO VERIFY IF YOUR CITY COUNCIL GIVES A % OF THE IBI FOR HAVING AN INSTALLATION OF SELF-CONSUMPTION. Every time they are more those that do it and it can suppose an increase of very appetizing profitability. Without going any further, the previous example is of a town that bonuses 50% of the IBI for 4 years, which means a saving in that particular case of almost 400 euros per year during the first four years, reducing the return of the investment to less than 4 years.